This is Part 4 of this Rhino 3D tutorial. This is the last part of this styling tutorial, so please hang on.
Note: This video shown below is an update of this styling detail’s concept modelling using Rhino Version 6
>>> Click here to go to Part 1 of this tutorial.
>>> Click here to go back to Part 3 of this tutorial.
In Part 3, we have created the 3 surfaces as shown below.

This styling detail appears to be completed, but it is not. There are still gaps at the 2 ends of the blended surfaces. These gaps may be small, but they will become problems during the downstreaming process for manufacturing or rapid prototyping. We will need to fix the 2 gaps.
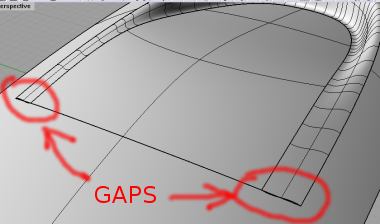
To fix the tiny gaps, lets work on one end of the blend surface first.
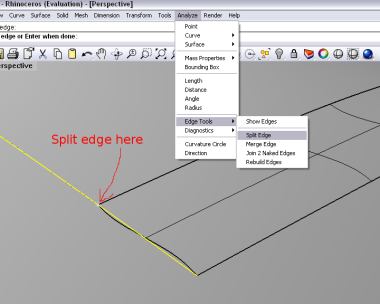
We will need to split the edge at the precise point as shown below. To do that, go to Analyze >> Edge Tools >> Split edge. Next, using Osnap (End), snap to the designated split point as shown below. This will cause the long edge to split into 2 at the precise point.
Now, we can align the surface to fill up the gap. To do that, we will need to use the Match Surface functions. Go to Surface Tools >> Match Surface. Select the end of the blended surface as the edge to change. Next select the short newly split edge as the edge to match. A Match Surface option box will pop up. At the Continuity section, select Position. See screen capture as shown below. This should cause the gap to be filled up.
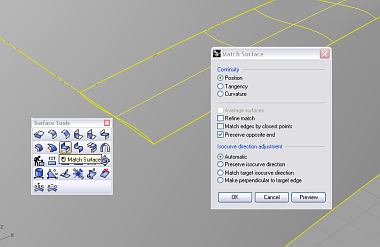
Do the same for the other end of the blended surface.
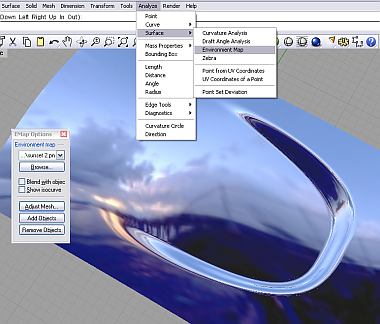
Once done, you should have a nicely created styling detail. You can use the Environment map and Zebra tools to evaluate the evenness of the surface.
Well, that is the end of this Rhino Styling tutorial.
I hope the tutorial is clear enough. Thank you for reading. 🙂
There are more techniques to be learnt in our Advanced Rhino 3D Modelling Course.
Please note: As software can behave in ways rather unexpected, I make no guarantee that the surface created will be totally error-free.

very interesting tutorial, nicely done, simply explained
I think surface from a network of curves works better in this case, you can skip using the “match surface” tool
Hi Neko,
I have tried the network of curve method. Somehow, the blend surface tool produce better smoothing in this case.
The ‘network of curves’ may create ‘ripple’ near the 2 edges used for the match.
Regards